webpack入门到精通
细数现今最流行的打包工具,非webpack莫属~
对比 webpack gulp grunt
webpack v1.x 2014.02
webpack v2.x 2017.01
webpack v3.x 2017.06
webpack v4.x 4.32.2 // 2018 02 正式版
webpack v5.x v5.50.0 // 2020 10 正式版
模块化
先介绍下jQuery的写法
1 | ----------------------jQuery------------------- |
- 命名空间
1
2
3
4
5
6
7
8
9var obj={}
obj.dev = obj.dev || {}
obj.dev.method = function(){}
obj.dev.add = function(){}
obj.dev.sub = function(){}
obj.sale = obj.sale || {}
obj.sale.remove = function(){}
obj.sale.append = function(){}
AMD和CMD
amd
全称:Asynchronous Module Definition
AMD 是 RequireJS 在推广过程中对模块定义的规范化产出cmd
全称: Common Module Definition
CMD 是 SeaJS 在推广过程中对模块定义的规范化产出
amd和cmd的区别:
- 对于依赖的模块,AMD 是提前执行,CMD 是延迟执行。不过 RequireJS 从 2.0 开始,
也改成可以延迟执行(根据写法不同,处理方式不同)。CMD 推崇 as lazy as possible. - CMD 推崇依赖就近,AMD 推崇依赖前置
代码示例
1 | // CMD seajs |
commonJS和es6 Module(es6模块化)
- commonjs
应用场景: nodejs
1 | module.exports // 导出 |
- es6 Module
应用场景: nodejs
1 | export | export default // 导出 |
cmd, amd, commonjs, es6 module有什么区别
AMD一开始是CommonJS规范中的一个草案, 由requirejs实现,所以amd一般指requirejs
commonjs属于服务端模块化机制,nodejs,webpack都是基于该规范来实现。
es6 Module是es6中规定的模块体系,有望成为浏览器和服务器通用的模块解决方案
es6 module对比commonjs区别
- CommonJS模块是运行时加载,ES6 Module是编译时输出接口;
- CommonJS加载的是整个模块,将所有的接口全部加载进来,ES6 Module可以单独加载其中的某个接口;
- CommonJS输出是值的拷贝,ES6 Module输出的是值的引用,被输出模块的内部的改变会影响引用的改变;
- CommonJS this指向当前模块,ES6 Module this指向undefined;
前面说的是js的模块化,下面说说css模块化
css模块化
OOCSS(面向对象CSS) // 适用于大项目
1 | ------------index.css----------- |
vue scoped/style scoped实现原理
AMCSS(属性模块) 属性选择器,避免使用过多的class
1 | ---------------index.css-------------- |
webpack 4.x
webpack 常用命令
1 | npm uninstall webpack -g // 卸载全局webpack |
webpack初始化项目
1 | npm init -y |
webpack多入口打包
1 | webpack app.js main.js -o bundle.js --mode "development" |
webpack基本配置
1 | module.exports = { |
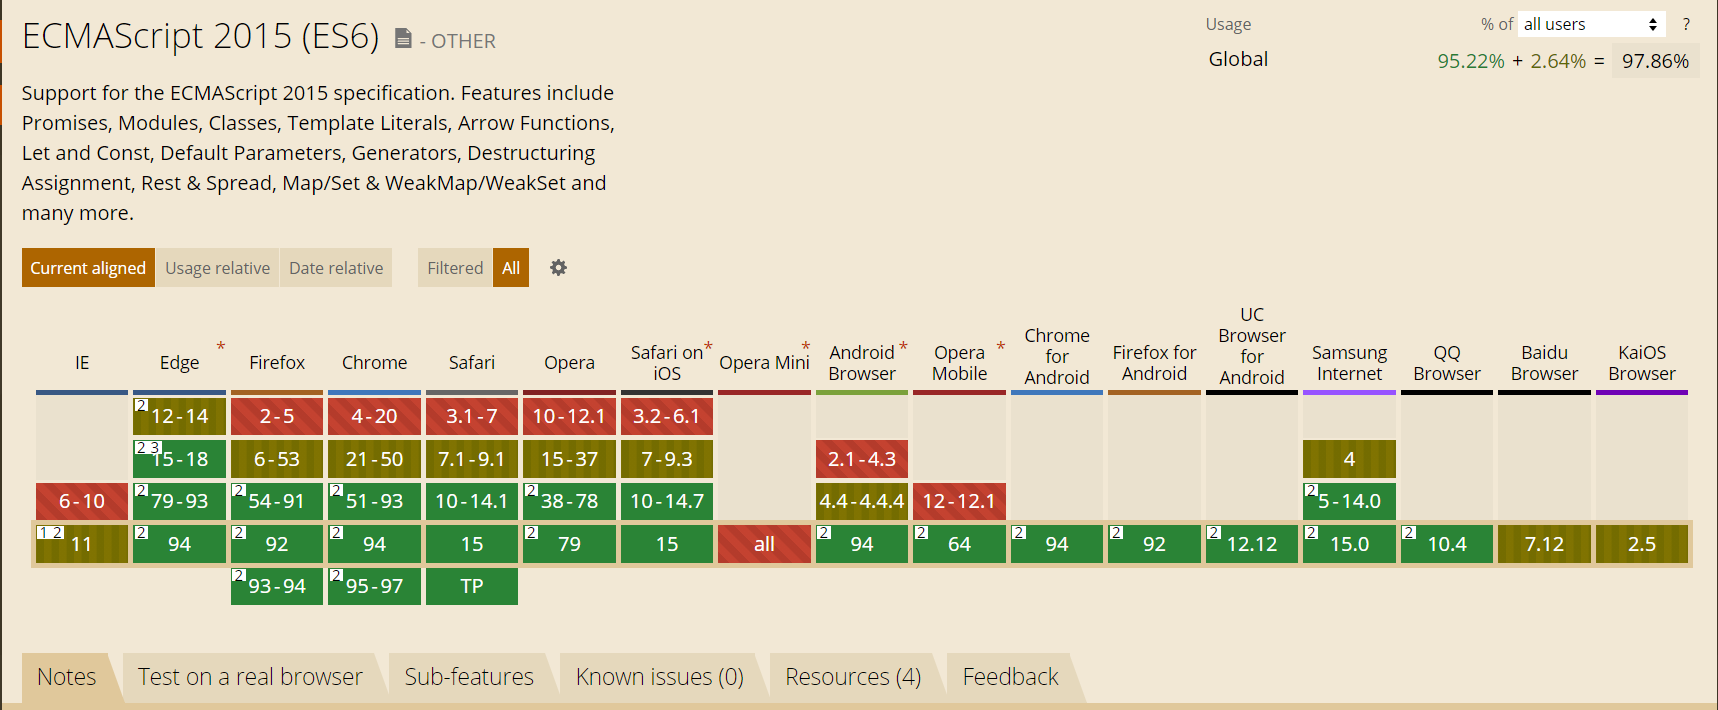
ES6+转es5语法
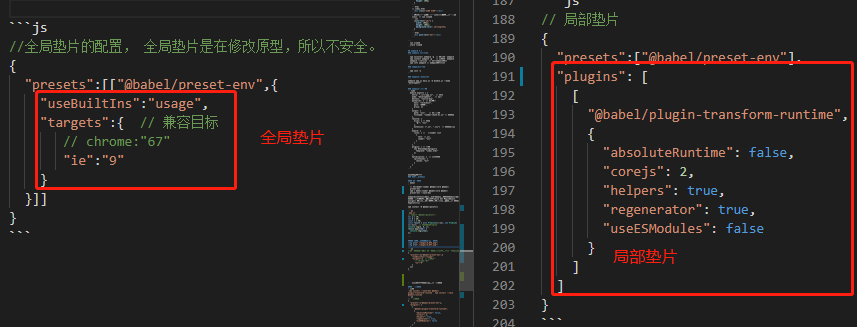
(1) 全局垫片
下载babel
npm i babel-loader @babel/core @babel/preset-env --save-dev
demo
webpack打包后只能将我们es6+的语法转成ES5的语法,但是ES6的一些内置API和功能(Promise Set Map)Object.assign() 如果我们要实现这些这些,我们需要使用 垫片库(polyfill)后台系统可以考虑不用babel-loader
npm install -D @babel/polyfill
1 | --------------------app.js-------------------------- |
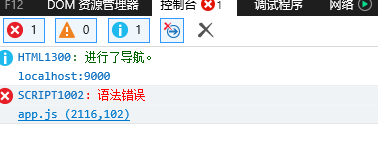
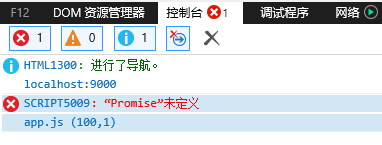
IE运行情况如下(未加垫片)
1 | -----------------babelrc------------------------ |
ps: 开发库或者框架的话请使用局部垫片
(2) 局部垫片
- 安装
npm install --save-dev @babel/plugin-transform-runtime @babel/runtime
demo
1 | -------------------babelrc------------------------- |
全局垫片和局部垫片的区别
支持ts
npm install --save-dev typescript ts-loadernpm install @types/lodash // 安装类型约束
demo
1 | ------------------demo.js------------ |
ts类型约束
http://microsoft.github.io/TypeSearch/
打包图片
npm install file-loader --save-devnpm install url-loader --save-dev // url-loader内置了file-loader,可以把图片写成base64格式
demo
1 | ---------------webpack.config.js--------------- |
打包css
npm install --save-dev css-loader style-loader
demo
1 | -----------webpack.config.js------------ |
打包css预编译处理语言(scss, less, stylus)
npm install sass-loader node-sass --save-dev
demo
1 | --------------webpack.config.js-------------- |
添加css3前缀
npm install -D postcss-loader autoprefixer
demo
1 | -------------------package.json----------------- |
css模块化打包
1 | -------------------app.js----------------------- |
配置支持font
1 | ---------------webpack.config.js-------------------- |
Plugins使用(常用)
npm install -D html-webpack-plugin // 模板配置npm install -D clean-webpack-plugin // 清除dist/数据
1 | --------------webpack.config.js------------------ |
模板中注入静态文件
npm i add-asset-html-webpack-plugin
demo
1 | --------------webpack.config.js---------------- |
静态资源同步到CDN
1 | ------------------webpack.config.js--------------- |
如下图:
sourceMap 的配置(快速定位到源码所在位置)
1 | ------------------webpack.config.js--------------- |
开启本地服务webpackDevServer
webpack --watch// 需要手动刷新浏览器webpack-dev-server// 自动刷新1
2
3
4
5
6
7
8
9
10
11
12
13
14
15
16
17
18
19
20
21
22
23
24
25
26
27-----------package.json---------------
{
"scripts": {
"dev": "webpack-dev-server --config ./build/webpack.config.js",
}
}
------------------webpack.config.js---------------
{
devServer: {
contentBase: "./dist",
open: true,
port: 9091,
hot: true, // 开启热模块更新,同时配置插件webpack.HotModuleReplacementPlugin
proxy: { // 反向代理
"/api": {
target: "http://localhost:9090",
pathRewrite: {
"^/api": ""
}
}
}
},
plugins: [
new webpack.HotModuleReplacementPlugin() // hot: true
]
}
HMR(热模块更新)
1 | ------------------main.js----------------- |
treeShaking
只有es module支持treeShaking(因为只有esModule支持单独加载模块的某个接口), 只有生产模式能做treeShaking(开发模式不支持),配置mode=production就可以了
demo
1 | -----------------package.json------------------ |
development 和 production
提取一个公共的配置文件webpack.common.js
npm i webpack-merge // 类似Object.assign
demo
1 | -------------webpack.dev.js-------------- |
两种引入第三方库的方式
通过expose-loader 进行全局变量注入
demonpm i -D expose-loader@0.7.5
1 | ----------webpack.config.js------------------- |
通过内置插件,webpack.ProvidePlugin对每个模块的的空间注入一个变量,然后去自动加载模块,就不用在每个文件内去引入import 或者require
1 | ---------------webpack.config.js---------------- |
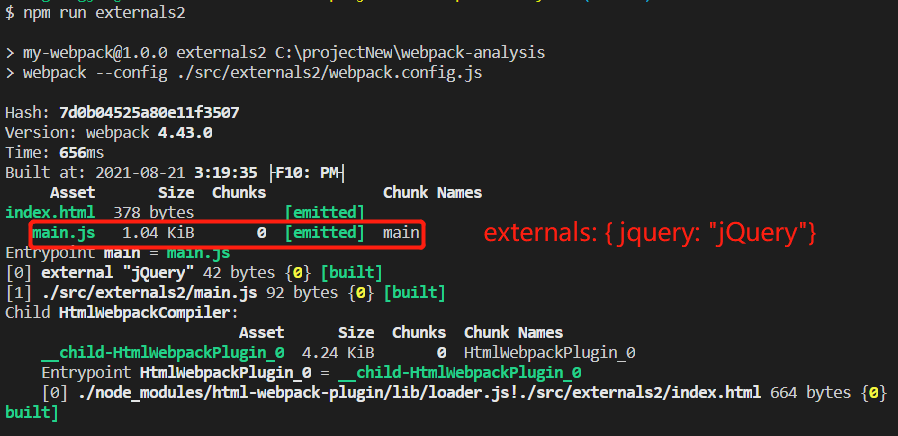
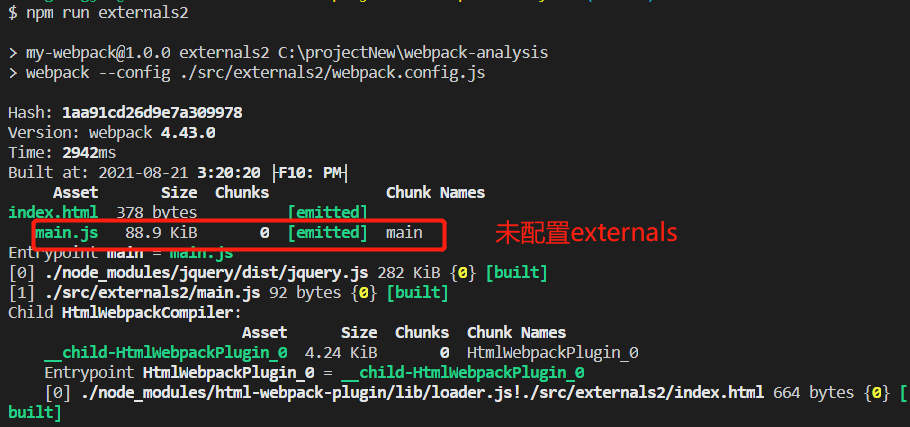
externals
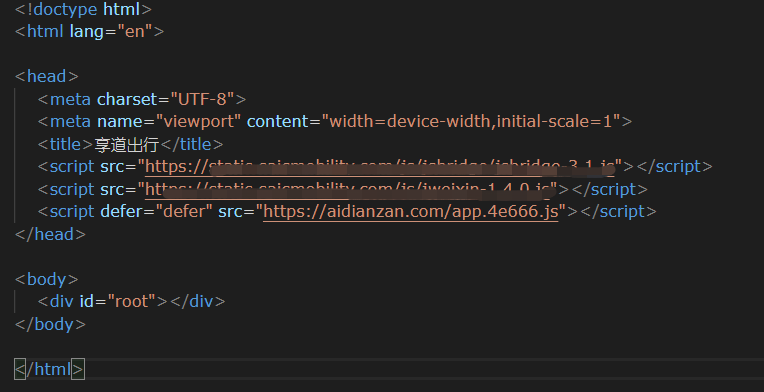
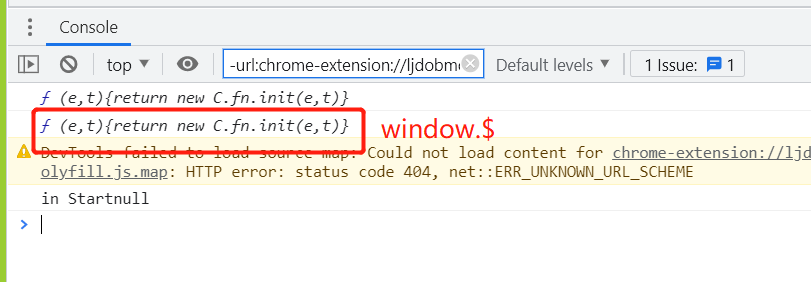
在html文件中引入cdn文件,在webpack配置externals,这样就不会打包引入的cdn的库
demo
1 | --------------------index.html----------------------- |
效果如下图:
反向代理
跨域的解决方式:
- jsonp // 只支持get,比较少用
1
2
3
4
5
6
7
8
9
10
11
12
13
14
15
16
17
18
19
20
21
22
23
24-----------------index.html--------------
<html>
<head>
<title>JSONP 实例</title>
</head>
<body>
<div id="divCustomers"></div>
<script type="text/javascript">
function callbackFn(result, methodName){
console.log(result)
result = JSON.parse(result);
var html = '<ul>';
for(var i = 0; i < result.length; i++)
{
html += '<li>' + result[i] + '</li>';
}
html += '</ul>';
document.getElementById('divCustomers').innerHTML = html;
}
</script>
<script type="text/javascript" src="http://localhost:3000?jsoncallback=callbackFn"></script>
</body>
</html>
1 | ---------------server.js----------------- |
- cors // 服务器配置
1
2
3
4
5
6
7
8
9
10
11
12
13
14
15
16
17
18
19-----------------index.html-----------------
<html lang="en">
<head>
<meta charset="UTF-8">
<meta http-equiv="X-UA-Compatible" content="IE=edge">
<meta name="viewport" content="width=device-width, initial-scale=1.0">
<title>cors</title>
<script src="https://cdn.bootcdn.net/ajax/libs/axios/0.21.1/axios.min.js"></script>
</head>
<body>
<div id="root"></div>
<script>
axios.get("http://localhost:3000/getJSON").then(function(response){
document.getElementById("root").innerHTML = response.data.hello;
});
</script>
</body>
</html>
1 | -----------------server.js---------------------- |
- proxy代理 // webpack支持配置
1 | -------------------webpack.config.js---------------------- |
代码分割(代码分割和webpack无关,用来提升性能)
- 入口起点(多入口):使用entry配置手动的分离代码
将不同的文件内引入的相同的库会分别打包到不同的文件中(使用很少)
1 | ----------webpack.config.js--------------- |
- 防止重复:使用SplitChunksPlugin去重和分离chunk, webpack4.x以前用CommonChunkPlugin
1 | ------------------webpack.config.js----------------- |
- 动态导入:通过模块的懒加载调用来分离代码
webpack4 默认允许import语法动态导入,它是ES7的提交草案,需要babel的插件支持,最新版的babel插件包@babel/plugin-syntax-dynamic-import注意:动态导入的最大好处是实现了懒加载,用到某个模块就加载哪个模块,SPA vue react路由懒加载 原理一样
npm i -D @babel/plugin-syntax-dynamic-import
1 | ----------------------app.js--------------------------- |
懒加载和动态导入有什么区别
动态导入的最大好处是实现了懒加载
打包分析
脚本加入 –profile –json > stats.json // 注意webpack和webpack-cli版本
把生成stats.json放入https://webpack.github.io/analyse/1
2
3
4
5
6
7
8
9
10
11---------------package.json----------------
{
"scripts": {
"analyse-file": "webpack --profile --json > stats.json --config ./src/analyse-file/webpack.config.js"
},
"dependencies": {
"webpack": "^4.43.0",
"webpack-cli": "^3.3.2",
}
}
插件分析
npm install --save-dev webpack-bundle-analyzer1
2
3
4
5
6
7
8
9
10
11
12
13
14
15
16
17
18
19
20
21
22
23
24
25
26
27
28------------webpack.config.js--------------
const path = require("path");
const HtmlWebpackPlugin = require('html-webpack-plugin');
const { CleanWebpackPlugin } = require('clean-webpack-plugin');
const BundleAnalyzerPlugin = require("webpack-bundle-analyzer").BundleAnalyzerPlugin;
module.exports = {
entry: {
app: "./src/bundle-analyzer/app.js",
},
mode: "development",
devServer: {
contentBase: "./dist",
open: true,
port: 9090,
hot: true // 开启热模块更新
},
output: {
filename: "[name].js",
path: path.resolve(__dirname, "dist")
},
plugins: [
new HtmlWebpackPlugin({
template: path.resolve(__dirname, "index.html")
}),
new CleanWebpackPlugin(),
new BundleAnalyzerPlugin() // 代码分析
]
}
prefetch和preload
prefetch 预加载
在网络空闲的时候,一般是首页核心代码加载完成之后,再偷偷加载其他js代码,即预加载。
资源的下载顺序权重比较低。也就是说prefetch通常用于加速下一次导航,而不是本次的。被标记为prefetch的资源,将会被浏览器在空闲时间加载。
1 | --------------main.js------------------ |
preload 优先加载(较高优先级)
通常用于本页面要用到的关键资源,包括关键js、字体、css文件。preload将会把资源得下载顺序权重提高,使得关键数据提前下载好,优化页面打开速度。
1 | -------------main.js------------ |
缓存带来的代码提升是有限的,所以懒加载代码优化成为我们性能提升的最重要的方式
css文件代码分割
- 安装插件
npm i -D mini-css-extract-plugin1
2
3
4
5
6
7
8
9
10
11
12
13
14
15
16
17
18
19
20
------------------webpack.config.js---------------
const MiniCssExtractPlugin = require('mini-css-extract-plugin');
{
module: {
rules: [
{
test: /\.css/,
use: [
MiniCssExtractPlugin.loader, // 替换掉"style-loader"
"css-loader"
]
}
]
},
plugins: [
new MiniCssExtractPlugin({})
]
}
css压缩
安装插件
npm i -D optimize-css-assets-webpack-plugin@5.0.1配置webpack
1
2
3
4
5
6
7
8
9
10
11
12
13----------------webpack.config.js-----------------------
const OptimizeCSSAssetsPlugin = require("optimize-css-assets-webpack-plugin");
const TerserJSPlugin = require("terser-webpack-plugin"); // 压缩css会使js压缩无效时使用该插件
{
optimization: {
minimizer: [new TerserJSPlugin({}), new OptimizeCSSAssetsPlugin({})],
},
output: {
filename: "[name].[contenthash:5].js",
path: path.resolve(__dirname, "../dist"),
chunkFilename: "[name]-[contenthash:5].js"
}
}
webpack浏览器文件存储
第三方库单独打包vendor,可以使用缓存
通过环境变量走不同的配置
1 | ----------------package.json------------------ |
编译vue
- 安装模块
npm i -S vuenpm i -D vue-loader vue-template-compiler
vue-loader只要是15.x版本都需要配置一个插件
demo1
2
3
4
5
6
7
8
9
10
11
12
13
14
15
16
17
18
19
20
21
22
23
24
25
26
27--------------------webpack.config.js-------------------
const VueLoaderPlugin = require("vue-loader/lib/plugin");
{
...
module: {
rules: [
{
test: /\.vue$/,
loader: "vue-loader",
exclude: /node_modules/
}
]
},
resolve: {
extensions: [".js", ".vue", ".json"],
alias: {
"@": path.resolve(__dirname, "src")
}
},
plugins: [
new VueLoaderPlugin(),
new AddAssetHtmlWebpackPlugin({
filepath: path.resolve(__dirname, "./dll/vendors.dll.js")
})
]
}
编译react
npm i @babel/preset-env @babel/preset-react -D
demo
1 | ----------------main.js------------ |
webpack打包速度优化
- 更新node或者webpack版本
- 减少loader转换
- 少使用非官方提供的插件
- 使用DllPlugin提高打包速度
配置多个dll文件
减少单个dll大小
1 | ---------------------webpack.config.js------------------- |
多线程打包
npm i thread-loader -D // 多线程耗费性能,慎重
1 | ----------------webpack.config.js------------- |
图片压缩
- 有损压缩
npm install imagemin-gifsicle imagemin-mozjpeg imagemin-pngquant imagemin-svgo --save-dev - 无损压缩
npm install imagemin-gifsicle imagemin-jpegtran imagemin-optipng imagemin-svgo --save-de
npm打包发布自己写的插件
npm login

npm publish
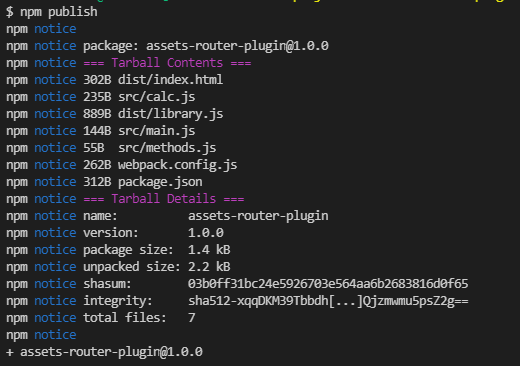
没有发布成功走下面3,4,5步
3. npm config get registry
4. npm config set registry=http://registry.npmjs.org/
5. npm publish
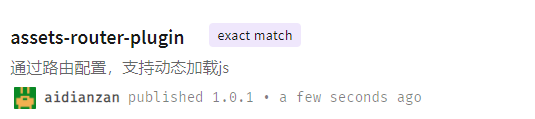
6. 代码更新,重新publish,需要更新版本号
1 | -----------------webpack.config.js-------------- |
- 测试自己发布的库
assets-router-plugindemo1
2
3
4
5
6
7
8------------------app.js---------------
import result from "assets-router-plugin"; // es6的import引入
console.log(result.calc.add(1,5)); // 6 亲测成功亲测成功
------------------main.js---------------
const assetsrouter = require("assets-router-plugin"); // commonjs引入自己发布的库
console.log(assetsrouter.default.calc.add(1,7)) // 8 亲测成功
编写webpack loader
1 | ------------webpack.config.js--------------- |
1 | // loader直接配置字符串,需要配置resolveLoader.modules支持loader查找 |
编写webpack plugin
1 |
|
- node调试
1
2
3
4
5
6------------------------------package.json----------------------
{
scripts: {
"debug": "node --inspect --inspect-brk node_modules/webpack/bin/webpack.js --config ./src/use-myplugin/webpack.config.js"
}
}
写自己的”webpack” (bundle)
bundle-demo项目文件目录如下:
├── README.md
├── src
│ └── index.js
│ └── message.js
│ └── news.js
├── package-lock.json
├── package.json
├── bundle.config.js
bundle项目文件目录如下:
├── README.md
├── bin
│ └── bundle.js
├── package-lock.json
├── package.json
实现bundle打包步骤如下
新建bundle文件夹
在bin目录下新建bundle.js
1
2
3
4--------------------bundle.js---------------
#!/usr/bin/env node
console.log("bunlde脚本执行");npm init -y, 修改bin目录
1
2
3
4
5
6----------------package.json--------------------
{
"bin": {
"bundle": "./bin/bundle.js"
}
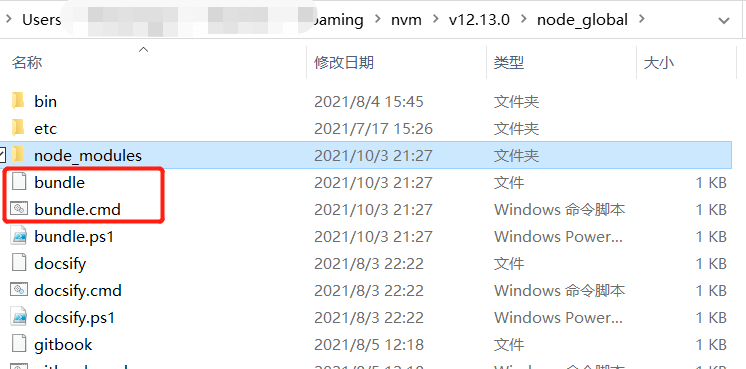
}把包发到npmjs.org,或者npm link(把bundle添加软链接到全局), 效果图如下:
读取bundle.config.js配置
1
2
3
4
5
6
7
8
9
10
11
12
13
14
15
16
17
18
19
20
21
22
23
24
25
26
27
28
29
30
31
32
33
34
35
36
------------------bundle.js--------------------
#!/usr/bin/env node
console.log("bunlde脚本执行");
const path = require("path");
var config = require(path.resolve("bundle.config.js"));
console.log(config); // 读取bundle.config.js
const Compiler = require("../lib/compiler.js")
new Compiler(config).start();
----------------bundle.config.js----------------
const path = require("path");
module.exports = {
mode: "development",
entry: "./src/index.js",
output: {
path: path.resolve(__dirname, "dist"),
filename: "app.js"
}
}
-----------------------index.js---------------------
var message = require("./message.js");
console.log(message.content);
-----------------------message.js---------------------
const news = require("./news.js");
module.exports = {
content: "今天天气 "+ news.content
}
-----------------------news.js---------------------
module.exports = {
content: "下雪22"
}编译类Compiler
1
2
3
4
5
6
7
8
9
10
11
12
13
14
15
16
17
18
19
20
21
22
23
24
25
26
27
28
29
30
31
32
33
34
35
36
37
38
39
40
41
42
43
44
45
46
47
48
49
50
51
52
53
54
55
56
57
58
59
60
61
62
63
64
65
66
67
68
69
70
71
72
73
74
75
76
77
78
79
80
81
82
83
84
85
86
87
88
89
90
91
92
93
94
95
96
97
98
99
100
101
102
103
104
105
106
107
108
109
110
111
112
113
114
115
116
117
118
119
120
121
122
123
124
125
126
127
128
129
130
131
132
133
134
135
136
137
138
139
140
141
142
143
144
145
146
147
148
149
150
151
152
153
154
155
156
157
158
159
160
161
162
163
164
165
166
167
168
169-------------------compiler.js--------------------
const path = require("path");
const fs = require("fs");
const parser = require("@babel/parser"); // 用来转换抽象语法树AST
const traverse = require("@babel/traverse").default; // require替换成__webpack_require__
const generator = require("@babel/generator").default; // 读取代码内容
const ejs = require("ejs"); // ejs模板
class Compiler {
constructor(config) {
this.config = config;
this.entry = config.entry;
this.root = process.cwd();
this.modules = {};
}
// 读取代码
getSource(filepath) {
return fs.readFileSync(filepath, "utf-8");
}
// 分析模块代码
depAnalyes(modulePath) {
//2. 获得入口文件内容
let source = this.getSource(modulePath);
let dependencies = []; // 依赖数组
// 3. 分析内容引入其他模块,使用@babel/parser转换成抽象语法树AST
// 查看AST抽象语法树地址:https://astexplorer.net/
let AST = parser.parse(source, {
sourceType: "module"
});
// 4. 找到代码require替换成__webpack_require__, type=CallExpression有require, @babel/traverse
traverse(AST, {
CallExpression: function(p) {
if(p.node.callee.name === "require") {
p.node.callee.name = "__webpack_require__";
// 6.更改require中的路径
let val = p.node.arguments[0].value;
let value = "./" + path.join("./src", val);
p.node.arguments[0].value = value.replace(/\\+/g, "/");
// 7. 根据路径去加载路径下的内容,分析文件内容,将这个路径push到一个数组中
dependencies.push(p.node.arguments[0].value);
}
}
});
// console.log(dependencies)
// 8. 递归所有依赖
dependencies.forEach(dep=> {
let newPath = path.resolve(this.root, dep);
// console.log(newPath)
this.depAnalyes(newPath);
});
// 9. 希望构建结果{"./src/index.js": "code..."}
let relativePath = path.relative(this.root, modulePath);
relativePath = "./" + relativePath.replace(/\\+/g, "/");
this.modules[relativePath] = generator(AST).code;
// console.log(this.modules)
}
// 替换模板文件
emitFile() {
let template = this.getSource(path.join(__dirname, "../template/template.ejs"));
let result = ejs.render(template, {
entry: this.entry,
modules: this.modules
});
let outputPath = path.join(this.config.output.path, this.config.output.filename);
// console.log(outputPath);
// console.log(result);
// 写入文件
fs.writeFileSync(outputPath, result);
}
// 编译入口
start() {
// console.log(this.root, this.entry)
this.depAnalyes(path.resolve(this.root, this.entry));
this.emitFile();
}
}
module.exports = Compiler;
// 模板文件
---------------------template.ejs-----------------------
(function(modules) { // webpackBootstrap
// The module cache
var installedModules = {};
// The require function
function __webpack_require__(moduleId) {
// Check if module is in cache
if(installedModules[moduleId]) {
return installedModules[moduleId].exports;
}
// Create a new module (and put it into the cache)
var module = installedModules[moduleId] = {
i: moduleId,
l: false,
exports: {}
};
// Execute the module function
modules[moduleId].call(module.exports, module, module.exports, __webpack_require__);
// Flag the module as loaded
module.l = true;
// Return the exports of the module
return module.exports;
}
// expose the modules object (__webpack_modules__)
__webpack_require__.m = modules;
// expose the module cache
__webpack_require__.c = installedModules;
// define getter function for harmony exports
__webpack_require__.d = function(exports, name, getter) {
if(!__webpack_require__.o(exports, name)) {
Object.defineProperty(exports, name, { enumerable: true, get: getter });
}
};
// define __esModule on exports
__webpack_require__.r = function(exports) {
if(typeof Symbol !== 'undefined' && Symbol.toStringTag) {
Object.defineProperty(exports, Symbol.toStringTag, { value: 'Module' });
}
Object.defineProperty(exports, '__esModule', { value: true });
};
__webpack_require__.t = function(value, mode) {
if(mode & 1) value = __webpack_require__(value);
if(mode & 8) return value;
if((mode & 4) && typeof value === 'object' && value && value.__esModule) return value;
var ns = Object.create(null);
__webpack_require__.r(ns);
Object.defineProperty(ns, 'default', { enumerable: true, value: value });
if(mode & 2 && typeof value != 'string') for(var key in value) __webpack_require__.d(ns, key, function(key) { return value[key]; }.bind(null, key));
return ns;
};
// getDefaultExport function for compatibility with non-harmony modules
__webpack_require__.n = function(module) {
var getter = module && module.__esModule ?
function getDefault() { return module['default']; } :
function getModuleExports() { return module; };
__webpack_require__.d(getter, 'a', getter);
return getter;
};
// Object.prototype.hasOwnProperty.call
__webpack_require__.o = function(object, property) { return Object.prototype.hasOwnProperty.call(object, property); };
// __webpack_public_path__
__webpack_require__.p = "";
// Load entry module and return exports
return __webpack_require__(__webpack_require__.s = "<%-entry%>");
})
/************************************************************************/
({
<% for(let key in modules) {%>
"<%-key%>":(function(module, exports, __webpack_require__) {
eval(`<%-modules[key]%>`);
}),
<% } %>
});
代码转成抽象语法树AST @babel/parser
require替换成__webpack_require__ @babel/traverse
AST树转换为code @babel/generator
模板文件 ejs
webpack的loader实现步骤
- 读取配置文件webpack.config.js中的module.rules,倒序迭代
- 根据正则匹配不同的文件,批量导入并执行loader函数
- 返回处理后的代码
webpack的plugin实现步骤
- 写一个js命名的函数,然后导出该函数
- 在插件函数原型上定义apply方法
- 指定一个绑定到webpack自身的事件钩子
- 处理webpack内部实例的特定数据
- 功能完成后调用webpack提供的回调
webpack借助tapable(类似node中event模块)实现了钩子
完整的demo
1 | -------------------bundle.js--------------- |